Top 100 Cake Blog

Top 100 Cake Blog

Monday, August 5, 2013

Mom's [Apricot] Upside-Down Cake


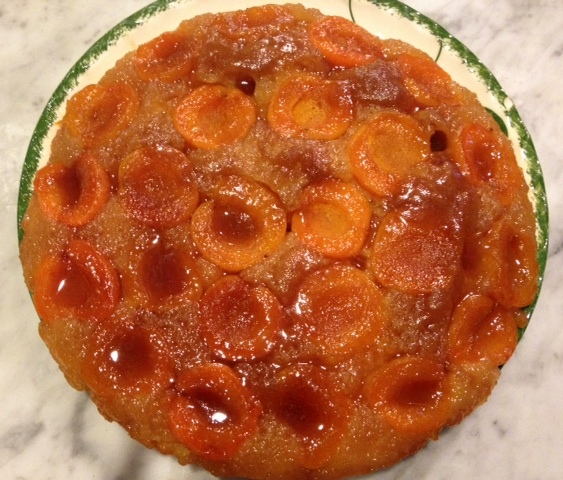
Mom's [Apricot] Upside-Down Cake made me face my fears -- flipping over a steaming hot cake from a hot frying pan to a serving plate (can anyone say second degree burn?).  As you can see above, I accomplished the feat. But the execution was imperfect -- I'm off by at least an inch.  It was well worth the effort; what the cake lacks in presentation finesse is made up in fabulous flavor.

And in the photo of a slice below, no one is the wiser.  (Except, I guess, everyone who reads this.)


Upside down cakes are traditionally made in a cast iron frying pan.  The cake is started on the stove top and then then pan is transferred to the oven. But since cast iron and I don't get along very well (I can never get them properly seasoned), I used a stainless steel frying pan.

While pineapple upside down cake is the mother of the genre, nearly any fruit can substitute. The vintage recipe gem I followed to make this cake calls for "any fruit" and, having purchased a box of apricots at the farmer's market this morning, that's what I used.

I wasn't daunted by the lack of instruction on the recipe card; that's typical of handwritten recipes.  But when I read that the cake portion itself contains NO BUTTER, I expected failure.  Instead, I reached nirvana. And you can too.

Begin by melting two tablespoons of butter in a 10-inch frying pan.  Add a cup of brown sugar and mix well. Spread it over the bottom of the pan and turn off the heat.


Wash a batch of fresh apricots.


Cut each fruit in half. No need to peel them, saving a tedious step that must be done with peaches.


Place the apricots cut side down atop the brown-sugar-butter mixture in the frying pan.


Prepare the batter, which consists only of flour, sugar, salt, milk, one egg and baking powder.


Spoon the batter atop the fruit, spreading it with the back of a spoon to cover the fruit entirely.


Bake for 30 minutes in a 350F oven.  When done, it will look like this.


Then, the terror begins, as you try to flip it onto a pan while bubbling hot.  (Do not attempt this while you've got dinner on the stove, as I did.  It adds unnecessary pressure to an already tense situation.)  The beautiful antique serving plate I intended to use kept slipping, so I tried a smaller dinner plate about the same size as the frying pan, which seemed less terrifying.


The recipe is below. It is really, really good.
Production notes: For the topping, melt the butter completely before adding the brown sugar.  For the batter, mix the dry ingredients first, then add the hot milk and combine.  Beat the egg and then add it to the batter and combine well.


Sunday, August 4, 2013

Spiced Nut Coffeecake


It was getting on near 10 p.m. one night last week and, wanting to bake something simple and cheerful (for baking is my antidepressant), I whipped up this tasty spiced nut coffeecake. Plus the DH loves cake with a crumbly topping.

This is simple and delicious, but not terribly spicy by our 21st century standards, the same standards that find cayenne pepper in brownies and salt in caramels.

Start by making the topping in a small bowl by combining the sugar, chopped nuts, spices and melted butter. Reserve while you prepare the batter, accomplished by mixing the dry ingredients and simply pouring the liquid ingredients on top.  Mix until just moistened.


The batter will be extremely thick and you'll think it can't possibly be right. For some reason, it behaves as if it is a yeast dough, i.e., very elastic .  But using a wooden spoon, or similar tool, become the boss of it and force the dough into the corners of the pan.


When it's spread out in the pan, sprinkle the topping on.


Production notes:  I followed this exactly, and melted the tablespoon of butter before mixing it into the dry topping ingredients. I also used butter in place of the "melted shortening or salad oil" for the cake.  The lines are typed very close together, causing the fraction ingredients to run into each other.  The amount for the topping are 1/4 c. sugar, 1/2 tsp. cinnamon, 1/4 tsp. nutmeg.  For the cake, they are 1/2 tsp. salt, 1/2 c. sugar, 1/2 tsp. cinnamon, 1 egg, 3/4 c. milk and 1/4 c. melted butter. This is easy to overbake, so keep a close eye on it.


Sunday, July 28, 2013

Rental House Chocolate Cake


Cooking in a rental house can be challenging, as in, why isn't there a ten-inch saute pan anywhere, but it can also be one of life's pleasures, involving creative compromise, enterprise and experimentation.*  On a recent family vacation to Orcas Island in Washington State, I upped the ante by not only cooking nearly all our meals, but also baking a chocolate cake.  The local vintage recipe, "Mrs. Mary Dow's Dark Cake," was in Faith, Food and Fond Memories, the Orcas Island Community Church Centennial Cookbook 1884-1984 that I purchased at the nearby town's only antique store.

I chose that recipe because its ingredient list included staples I'd already bought, including the most delicious fresh milk (see how the cream has risen to the top?) at Coffelt Farm and fresh eggs from Once in a Blue Moon Farm whose yolks were deep yellow.


Begin the recipe by "measuring" the butter so that it's the size of an egg.


Put the rest of the ingredients together.


And add the melted chocolate.


The recipes says to beat the batter well -- "The more it is beaten, the better it is."  I didn't do this, as overbeating usually results in a tough cake texture.  (But, in an attempt to follow the recipe instructions, I did beat it a bit more than normal.)  The batter will be very thick.  Spoon into the prepared pan (the closest you have to 9 x 13 inches) and smooth the top. Bake in a 350F oven.


Remove from the oven and, when cool, frost with any chocolate frosting.  (I used a modern chocolate buttercream I found on the internet, as the vintage cookbook didn't have any.)


Cake with some fresh Orcas Island berries.


Cake enjoying ocean view.


Our rental house, and some of its temporary occupants.


*For more about rental house cooking, read this great article by Melissa Clark in The New York Times.

Monday, July 22, 2013

Lemon Snowballs


When the summer heats up, there's nothing better than a fresh-baked batch of  lemon snowballs.  These delicious lemony cookies covered in confectioners sugar "snow" will make you forget that it's 95 F outside.

While the oven is preheating (and simultaneously heating your kitchen to scorching temperatures, all worth it, I can assure you) start the cookies.  Zest and juice the lemons.  I find a lemon reamer to be best for the juicing and a microplane ("helpfully"not pictured) for the zesting.


Chop the nuts fine; I used walnuts, but pecans would be great, too. You could use a food processor, but I did it old school, with a knife.


The batter will look curdled at the beginning, but soldier on.


Form the dough into ball the size of a "SMALL walnut" instructs the vintage recipe card.

This is best accomplished by dipping your hands in flour.


Bake until light brown on the bottom (but barely colored on top).  You can use a small spatula to lift the cookies to peek.


As soon as they're out of the oven, roll them in confectioners sugar.


Put them on a rack to set.  Or a plate would be fine.


And for those of you who have read to the end, here's a real snowball (three, actually) saved in our freezer from the NYC Blizzard of 1996.


Friday, July 12, 2013

Blueberry Cake


Finding myself with way too many blueberries from a recent berry picking adventure in Fishkill, New York, I set out in search of a blueberry muffin recipe among my thousands of vintage recipe cards.  I couldn't find a single one.  But then I remembered a stash of recipe cards from New Englander Olive Facey that I had set aside and voila, the first card in the pile was Blueberry Cake!  (If your heart is set on muffins, this recipe would work perfectly.)

This is a delicious cake; the nutmeg adds a really nice flavor note.


Although the recipe doesn't say to, it's best to coat the berries in a small amount of flour to prevent them from sinking to the bottom.


Alternate adding the dry ingredients and flour to the butter-sugar mixture.


Carefully fold in the blueberries at the end.


The batter is quite thick; you'll need to use the back of a spoon or offset spatula to spread it in the pan.


If you flour and grease the pan, the cake releases beautifully.


Like many of the recipe cards in my collection, this is little more than a list of ingredients.  The method I used is below.


Blueberry Cake
Preheat oven to 400F.  (I baked it at 350, but next time would raise the temperature or bake it a bit longer than the 30 minutes called for.)
Grease and flour an 8-inch pan.

Mix 1/4 cup (1/2 stick) room temperature unsalted butter with 1/2 cup sugar until light and fluffy.
Add one egg and combine well.
Combine 2 cups flour, 2 1/2 teaspoons baking powder, 1/2 teaspoon salt and 1/2 teaspoon ground nutmeg in a bowl.
Add the dry mixture and 3/4 cups milk, alternately to the butter-sugar mixture, beginning and ending with the dry ingredients.
Fold in the blueberries.  (I used about two cups.)
Pour into pan, and spread to the edges.
(I topped the cake with some brown sugar.)
Bake until a cake tester comes out clean.
Cool and serve.  Enjoy!

Sunday, July 7, 2013

Fresh Raspberry Pie


Some people favor winter, others summer.  My favorite time of year is raspberry season which occurs twice in the northeast -- right now, and in the fall.  The DH and I were lucky enough to spend July 4th with friends in Beacon, New York, and equally lucky to visit nearby Fishkill Farms where we picked cherries, blueberries and red, black and white raspberries.  This was my first encounter with white raspberries; they are not as sweet as the red or black (and much whiter in real life than they appear in the photo).


Anyone who has succumbed to the zen of berry picking knows that it's very easy to pick more than one can possibly eat and since raspberries begin to decompose the moment they're picked, there was but one thing to do: make a fresh raspberry pie.

I quickly put together a pie crust (recipe below) and, following a vintage berry pie recipe, prepared the pie.  It's really, really easy.  Just roll out the bottom crust, gently fold the berries into some flour, sugar and salt, and pour into the shell. Dot with a generous amount of butter. Roll out the top crust and you're good to go.


It's difficult to know how much thickener (flour, cornstarch or tapioca) to add to absorb the liquid from the berries without turning the filling into a gloppy gelatin substance.  I followed the recipe exactly (and even cheated by adding a bit of small pearl tapioca to the bottom of the pie) but still too much liquid was released.   Not a huge problem, and I didn't hear any complaints.


Some production notes:  I added more raspberries than called for, because I had them, and dotted with about three tablespoons of unsalted butter (not two).


Pie Crust

3 1/4 c. all-purpose flour
3 t. sugar
1 1/2 t. kosher salt
1 1/2 sticks cold unsalted butter (12 tablespoons) in pieces
9 T. cold Crisco in pieces
ice water

Place flour, sugar and salt in a food processor and mix until combined. Add the butter and shortening and mix until the size of small peas, or smaller.  Add ice water, one or two tablespoons at a time until the dough holds together.  Check this by removing the top and pressing the dough between your fingers. Divide in two pieces and refrigerate until firm.  Roll out to line and top pie pan.